Designing a false ceiling for a small bedroom can feel complicated—especially when you’re working with limited height, tight layouts, and the need to maximize brightness. Yet, the ceiling is one of the most important design elements in a compact bedroom. It can make the room feel larger, enhance lighting, hide wiring, improve insulation, and elevate the overall aesthetics of the space.
However, when installed incorrectly, a false ceiling can do the exact opposite: reduce headroom, absorb too much light, and make the room feel smaller than it actually is.
This comprehensive guide walks you step-by-step through how to plan, design, and install a false ceiling in a small bedroom. You’ll learn about costs, best materials, installation methods, lighting integration, common mistakes to avoid, and when to hire a professional.
Let’s get started.
Why Install a False Ceiling in a Small Bedroom?
A false ceiling—also known as a dropped ceiling or suspended ceiling—is essentially a secondary ceiling installed below the main structural ceiling. While commonly used for aesthetics, it offers many functional benefits, especially in small bedrooms.
1. Hides Wiring, Ducts & Imperfections
Modern homes often have ceiling-mounted AC pipes, wiring, and lighting conduits. A false ceiling conceals all of these neatly, giving the room a cleaner, more polished look.
2. Enhances Lighting Design
False ceilings allow you to add recessed lighting, cove lighting, LED strips, and even backlit panels—techniques especially useful in small bedrooms to create brightness without bulky fixtures.
3. Improves Thermal & Sound Insulation
A small air gap between the false ceiling and main ceiling helps reduce heat transfer and echo. Bedrooms next to loud areas benefit significantly from this.
4. Creates a Spacious Visual Effect
A well-designed minimal drop false ceiling actually makes a small room feel taller and wider by distributing light evenly and removing visual clutter from exposed wiring or beams.
5. Enables Creative Aesthetic Designs
Tray ceilings, shallow geometric layouts, and minimal layered designs work beautifully in compact spaces, allowing you to personalize the room without overpowering it.
Pre-Installation Planning: The Most Important Step
Before buying materials or calling a contractor, you must plan the layout carefully. Small bedrooms leave no room for installation errors because ceiling height, fixture placement, and lighting all matter.
Room Assessment & Measurement
Start by measuring:
- Room length
- Room width
- Ceiling height
- Any beams or structural elements
- Location of electrical points
Most small bedrooms are between 9×10 ft to 11×12 ft, with ceiling heights ranging from 8–9.5 ft. This means your false ceiling drop should stay between 3–6 inches in most cases.
Anything more than that will noticeably reduce usable height.
Need more details on pricing and professional services? Read our complete ceiling buyer’s guide.
Lighting Layout Planning (Do Not Skip This)
Lighting is the heart of a false ceiling design. DO NOT install ceiling boards until your lighting layout is finalized.
Think about:
- Where your bed is placed
- Whether you want reading lights
- Where ceiling fans should go
- Symmetry of lighting
- Whether you want warm or cool ambience
- Use of recessed lights vs LED strips
Well-planned lighting can create a luxury look even in a 100 sq. ft. bedroom.
Choosing the Right Material
Your false ceiling’s durability, cost, and appearance all depend on the material. Here are the best options for small bedrooms:
Gypsum Board
- Lightweight
- Smooth finish
- Works for simple & modern designs
- Ideal for recessed lights
Best for: Most small bedrooms
POP (Plaster of Paris)
- Very flexible for creative shapes
- Seamless look
- Takes longer installation time
Best for: Curves, detailed shapes, patterns
PVC Panels
- Waterproof
- Budget-friendly
- Low maintenance
- Not ideal for high-heat lighting
Best for: Humid regions or rental homes
Wood / Wooden Finish Panels
- Warm, cozy aesthetics
- Heavier and costlier
- Should be used sparingly in small rooms
Best for: Accent zones or partial ceilings
Tools and Materials Needed
If you’re hiring a professional, they’ll bring their own tools. But knowing what’s required helps you estimate cost and prevent shortcuts.
Tools
- Power drill
- Screw gun
- Laser level
- Measuring tape
- Plumb line
- Putty knife
- Trowel
Materials
- Gypsum or POP panels
- Metal framework (channels)
- L-angles and perimeter sections
- Suspension wires
- Screws & anchor plugs
- Joint compound
- Corner tape
- Lighting fixtures
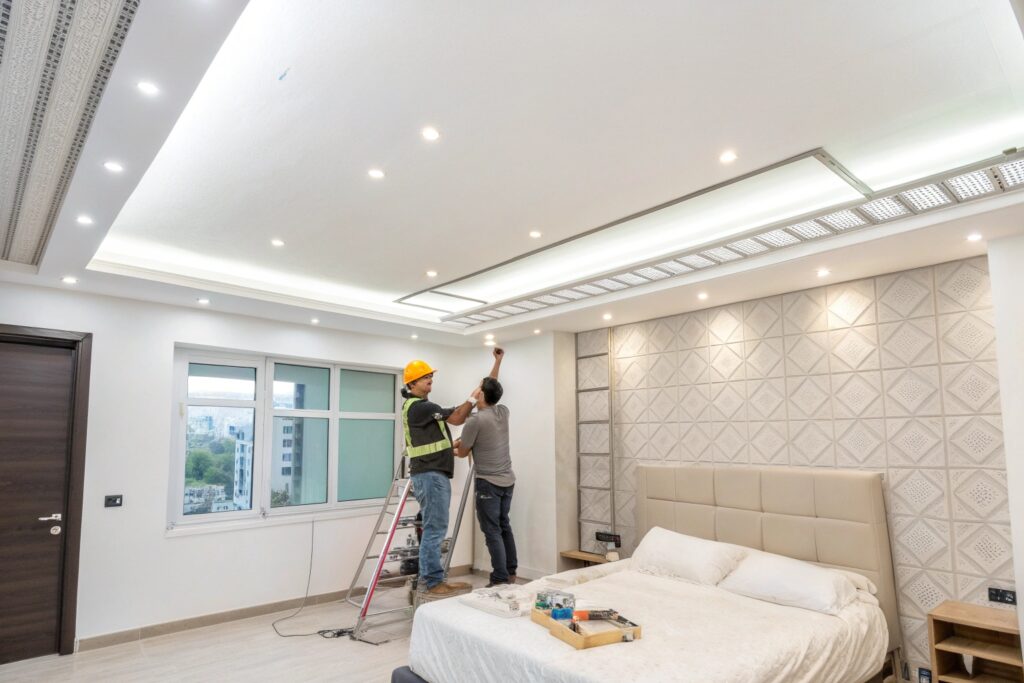
Step-by-Step False Ceiling Installation Process
This is the most important part of the guide. Here’s a complete breakdown in a beginner-friendly, detailed flow.
Step 1 — Marking the False Ceiling Level
The installation begins by determining the height of the false ceiling.
In small bedrooms, aim for a 3–4 inch drop minimum and 6 inch drop maximum unless lighting requires more space.
The installer marks a horizontal line around the room using a laser level for accuracy.
Step 2 — Installing the Perimeter Channel
A metal L-angle or wall-mounted channel is fixed along the marked line.
This creates the support perimeter where the false ceiling grid will rest.
Important considerations:
- Use rust-free metal channels
- Ensure the perimeter is perfectly level
- Fix securely using proper wall plugs
This step sets the foundation for the entire ceiling, so accuracy matters.
Step 3 — Fixing Suspension Wires
Suspension wires hang from the main ceiling to support the primary channels. They must be spaced evenly to distribute weight and prevent sagging.
Spacing typically:
- Every 4 feet for gypsum boards
- Every 3 feet for heavier POP designs
Each wire is firmly tied and adjusted to maintain consistent height.
Step 4 — Installing Main Channels
Main channels (also known as primary runners) are fixed to the suspension wires. These long metal bars form the framework on which the ceiling panels sit.
Must check:
- Levelness
- Stability
- Alignment
Uneven main channels result in uneven ceiling panels.
Step 5 — Adding Cross Channels to Create a Grid
Secondary channels (cross channels) are installed next, intersecting with main channels to form a grid pattern—usually 2×2 ft or 2×4 ft.
This grid determines:
- Panel size
- Layout symmetry
- Lighting placement
The grid must be strong enough to hold the boards without flexing.
Step 6 — Fixing Gypsum/POP/PVC Ceiling Boards
The ceiling material—gypsum boards, POP sheets, or PVC tiles—is now cut to size and fixed to the grid using self-drilling screws.
During this step:
- Openings are cut for lights
- Fan mount reinforcements are added
- Access panels (if needed) are installed
Boards must sit flush with each other to avoid visible joints.
Step 7 — Finishing: Taping, Sanding & Painting
Once the boards are installed:
- Joints are taped
- A joint compound is applied
- Surface is sanded
- Primer is added
- Final paint is applied
A smooth finish is essential for premium aesthetics.
Step 8 — Installing Lights & Final Touches
Recessed lights, LED strips, and cove lighting are installed after the paint fully dries.
Important:
- Avoid high-heat halogen bulbs for safety
- Choose warm lights (3000K) for bedrooms
- Ensure wiring is safely packed
Your false ceiling is now complete.
False Ceiling Cost for Small Bedrooms
Costs vary depending on materials, complexity, and city.
Gypsum False Ceiling Cost
₹80–₹150 per sq. ft.
PVC False Ceiling Cost
₹120–₹250 per sq. ft.
POP False Ceiling Cost
₹150–₹300 per sq. ft.
Wooden Ceiling Cost
₹250–₹600 per sq. ft. (for accents)
Additional Costs
- Recessed lights: ₹300–₹900
- LED strips: ₹150–₹400 per meter
- Electrical labor: ₹800–₹2,000
Total cost for a small bedroom (100 sq. ft.):
₹10,000 – ₹25,000 on average.
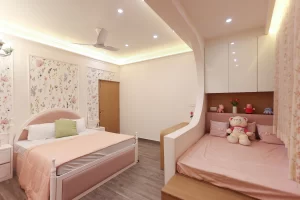
Best False Ceiling Designs for Small Bedrooms
Minimal Single-Layer Ceiling
Clean, flat gypsum board with recessed lighting. Ideal for height-limited rooms.
Shallow Tray Ceiling
A soft recessed border with warm LED strips gives a luxurious yet spacious look.
Linear LED Ceiling
LED lines built into the ceiling give a modern, space-expanding feel.
Floating Ceiling Panel
A smaller panel suspended slightly below the main ceiling—great visual depth without heavy drop.
Geometric Minimal Designs
Soft rectangular borders or thin trims for a premium effect.
Tips for a Successful False Ceiling in Small Rooms
- Keep it simple and minimal
- Use light colors (white or off-white)
- Choose warm LED lighting
- Avoid heavy layers or deep tray ceilings
- Keep the drop height as low as possible
- Always pre-plan wiring and lighting
- Don’t overcrowd the ceiling with patterns
Common Mistakes to Avoid
- Dropping the ceiling too low
- Adding too many recessed lights
- Using dark or glossy colors
- Ignoring proper ventilation
- Using heavy materials in low-height rooms
- Not aligning lights with room layout
Avoiding these mistakes ensures your small bedroom looks more spacious rather than cramped.
Maintenance Tips After Installation
False ceilings require minimal care but must be maintained properly:
- Dust lightly every 2–3 weeks
- Avoid harsh cleaners
- Check for dampness if bathroom or AC ducts are nearby
- Replace faulty lights carefully
- Inspect joints annually for cracks
PVC ceilings need the least maintenance, POP requires the most.
Should You Hire a Professional or DIY?
Hire a professional if:
- You have a complex lighting plan
- You want multi-layer or tray designs
- You need electrical rewiring
- Your bedroom has beams or height issues
DIY is possible only if:
- You’re installing a simple flat gypsum ceiling
- You have basic carpentry skills
- No electrical changes are needed
For small bedrooms, professional installation is recommended for best results.
Conclusion
A false ceiling can transform a small bedroom when designed and installed correctly. It enhances lighting, hides imperfections, improves insulation, and adds a premium aesthetic appeal. However, small spaces demand careful planning—especially regarding height, lighting, material selection, and layout.